Translate

Tuesday, August 2, 2016

Storing Metal Dies


Hi, 
     And welcome back...

Today I would like to share a quick and easy way to store Spellbinders dies and other metal cutters neatly and securely.  

We all know how easy it is to lose some of the smaller dies and keeping them organized in their original package is not always easy.
But, it can be.

Here is how I store mine.

I place them on a piece of magnetic sheet.

No, I know, it is not entirely a new idea, I just think that these magnetic sheets work better than the ones I had tried before and are quite economical.

I buy them at The Home Depot hardware store at a cost of $4.47.  They come in a pack of 3,  8x15 inch sheets. You can find them in the AC department.  They are air vent covers.
This is also the best price I have seen for strong magnetic sheets.
They are white on one side (non-magnetic side) and black on the other (magnetic side).


Ok, so, this is what I do.

I place the dies on the magnetic sheet.  I play around with them to get a good fit (save space).  You can also make the sheet a little shorter than the die to allow for easier removal.
Then just cut to the size you need.


Once you've got that done, if you still have the package cover that came with dies, you can store them back in there.

I will show the different ways I have been storing them.

Here it is in the older packaging.
                                           Notice I folded a piece of the flap up to hold the the sleeve.
                                                     I glued the pocket on the left to hold the other die.

Here it is with the newer packaging.

                             Just store them in the package and when you take them out they are all together.
                                        It is so easy to find the one you are looking for and keep all the
                                                             pieces together without any extra bulk.

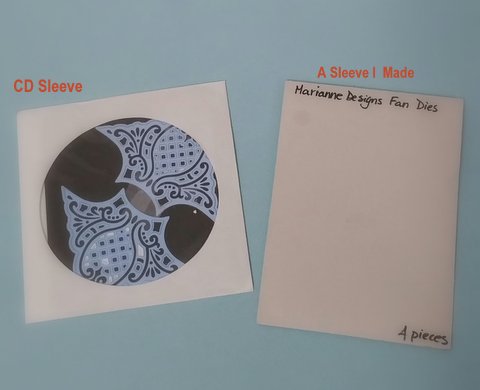
And here if you do not have the original packages, you can just use a CD sleeve or make one yourself.

                     Notice that I also label the sleeves with the die description and the number of pieces per set.

Here is a template for the sleeve.  You can size as needed.

                                   This one is 11 in. x 6 1/4 in.  The folds are at the 2 7/8 and 8 1/4 markings.   
                                                                    The bottom flap is 1/2 in. wide.
                                                                     Again, you can size as needed.
                                                  
Well, I hope you enjoyed the post.
Leave a comment, question or share your ideas.  I would love to hear from you.

 Smiles and  happy crafting to you all...


ScanNCut 2 VS Cricut Explore...


What I think about the ScanNCut 2 (CM350)...
     And how it compares to the Cricut Explore.


Hi... 
          and welcome back.

The only reason I am actually calling this a "comparison" is for the purpose of pointing out what I like most of either machine, not necessarily to dwell on the things I like the least.

So, lets get right to it...

Simply stated... I LOVE  THEM BOTH...  

The ScanNCut 2 and the Cricut Explore!


The ScanNCut2:

I really love how easy it is to cut out pretty much any stamped image or hand drawn design or words.
It has got to be the best cutting machine on the market for this particular job.                              
-And, it does not stop there!  No, there is a lot more this wonderful machine can do.

Ok, so, for cutting out your stamped images you have two options to choose from.

You can either just scan and cut the stamped image.
In this case, you select "Direct Cut" and the machine will scan and cut. Click on two or three buttons and DONE.
And another really good thing about it is that you can stamp on 12 x 12 inch cardstock/paper  and there are no "reading guidelines" to worry about so can actually use most of the 12 x 12 space.  I leave about 1/4 inch edge along the sides blank.  
You can leave a white edge around the stamped image or cut right along the outline.
You do not have to scan, import to your computer, print...and then cut.
                                                  OR
You can scan and save the outline on your machine or a USB memory stick.
Here, you can scan the outline or image, save it, and then you can use it anytime you need it again.
Or you can also save it to your computer via USB cable, or wirelessly (Activation Required...read further)

***I will post some other tips on cutting stamped images soon with pictures.***  

The Best Thing About This Machine Is That YOU DO NOT HAVE TO BE CONNECTED TO A COMPUTER OR THE INTERNET TO USE IT (or at least not for most projects I don't)!!!
You can just work from the screen on the machine.
The screen is actually large enough to read and easy to work on. You can also increase the image by up to  400% for easier viewing.

You will need to be connected to a computer and Internet when you need to convert  SVG files to FCM (format used with the ScanNCut Canvas).
Then once you import your image the software will convert it for you.  It was fairly easy to do.
(This is the only time a computer and Internet connection are needed.)

There is a free software program for the ScanNCut2.
The ScanNCut Canvas.  It is a downloadable software program.
It is fairly easy to learn and is really good.  I like how we can "really" alter shapes with this program.
It is for more than just welding and sizing, you can actually change shapes; bend or straighten,  add and remove parts of the image at different points.

I do, however, find it easier to "Clean" an imported image on the Explore, than on the SNC2. 
Or maybe I just have to learn the right way to do it...Lol

The CM350 model that I am using is "wireless" ready. But you will need to buy the "Activation Card" separately at a cost of $44 - $50.00 more.  (See Amazon)

At the moment I am using mine via USB cable, on the rare occasion I do need to connect to the computer, and it works just fine, but I do see where the "wireless" method would make it even easier when using the ScanNCut Canvas program.  Definitely when you are importing and image.  The wireless method would be much faster as it would go straight from scanner to ScanNCut Canvas. For now I have to save it to the machine or a USB Stick and then to the computer.  Not that big a deal, but -I'll probably get the Activation Card later on.

You can also watch many "how to" videos on  www.brother-usa.com   click on "Products" and then  Click on ScanNCut.
You will find lots of information about the ScanNCut 2 .  
Note:  There are 2 different Models.  CM 350 and CM650w.
Here I am talking about the CM 350 model.
The videos are easy to understand and follow.  And they are very informative.
Also, watch videos on YouTube.  There are tons of great videos there.

I pretty much was able to do all that I wanted  to do within 2 or 3 days. 
Now that does not mean I know how to do everything it can do already, just that I can do what I want to do without any hassles.  There is so much more for me to learn and do.  I keep learning something new everyday. It's so exciting...

The only thing I would say I wish were a bit better are the mats.  But although they feel somewhat flimsy they actually work well. 
But I guess I am used the stronger Cricut mats.
And they are pretty pricey, too.
Shop around for prices because sometimes you can find them at big differences in price.
- Also check for freight charges  AND return policies.

Sometimes if the material I am using, which is usually 110 lb. cardstock does not stick well, I gently run a brayer over the cardstock to make sure it adheres well.  It always works for me.
- And if needed, for added security, I use clear tape on the four corners.  (But that is seldom needed.)

However, if you find that your mats are too sticky, just place the palms your hands flat on the mats and lift.
Do this a couple of times all over the mat, or just on the area you are currently using.
But be careful not to over do it or you will lose too much tack. 
 You do not want either.

So far I have only used the Standard Mat (purple and turquoise).  I have been using it for about 3 months now, and so far so good.  I cleaned it once with a baby wipe to gently remove some of the residual paper fuzz.  (Whichever wipes you use, just make sure they are alcohol and aloe, or any lotion/oil free wipes.)


About the blades:

So ,yes, of course it comes with a blade. but it is the "Standard" blade.
This one would be for regular paper and cardstock and some fabrics.
-Not for cutting thicker materials like cardboard or chipboard.

They do have a "Deep Cut" blade holder/casing that they sell separately.
But the BLADE is NOT INCLUDED with the holder. Blade is sold separately.


Blade Settings: Blade Depth and Pressure


I have read and heard of some people having problems with the blade depth and pressure.


The way I understand it is, the blade depth refers to the setting for the thickness of the material to be cut and the pressure refers to how much "pressure" is needed to push the blade through the material.

Hopefully I am correct but, nonetheless, these are the settings that have worked for me: (With the Standard blade)

Cardstock:  110 lb.  #6 Depth and 2 or 3 Pressure (This setting also works with the                                                                                                                      Recollections Brand Cardstock from Michaels Craft Store 65 lb.) 
Paper:           24 lb.   #2 Depth and 0 - 1 Pressure
Stabilized Fabric:   #6  Depth and 3 Pressure  (I use freezer paper as a stabilizer.  Iron shiny side of the paper to the                                                                                                   back of the fabric (Cotton or cotton/poly).)

But you should start at lower numbers and work yourself up or down to the right setting for the cardstock, fabric, paper or whatever material you plan on using.

Results will vary and you will have to make a few "Test Cuts".
They have a "Test Cut" option, too.

Write your settings down on a pad so you can refer back to it as needed.
For example the, material type and weight and the settings that worked.

I also do this with any new project so that I can remember how to do it the next time.
-I write down the steps.  (and my friend Dolores asked that I mention this so you all keep your own "Checklist".  It is very helpful when we are newbies.) 

 So, remember, just start with low settings or you may just cut right through your mat too.
(But if that happens just tape your mat from the back. Lol)

You can also use the ScanNCut Canvas on the iPads.  Check out  how it works online.
I have not used it yet because I do not have the wireless access code (Activation Card).

So, this is just a brief description of my experience with and observations of  the ScanNCut 2 so far.

I LOVE IT!

If you decide to buy one, I am sure you will enjoy it too.


Oh, and as for the speed, I keep it at 3.  I have not worked on any project or design that has required it to be changed from its default setting.


Who would benefit the most from the ScanNCut 2 vs. the Cricut Explore?

Well, let's see...

I already own a Cricut Explore, so the best way to offer my opinion is to compare the two machines.

First, let me state that  I do absolutely ADORE my Explore and all that I am able to do with it.  I really do.  I also like all the new beautiful cartridges that they have released in the past few years.  Oh, all of Anna Griffith's collection.  So beautiful!
These are more adult themed than their former ones.

So, if you are the type of crafter that needs pre-designed projects, then the Explore may be the right machine for you.  Go on their site and read and watch their videos. 

Their Design Space software is very useful and colorful.  I find it to be a great application and truly enjoy using it.

But, to use it YOU MUST ALWAYS BE CONNECTED TO A COMPUTER AND STRONG INTERNET SERVICE.  Call Cricut and ask if your computer meets the requirements as not all computers are compatible.

You can use their cartridges only if link them to your Cricut Online Account (Required) or  have a subscription to their "Cloud Based" Image Library. 

 You can also create and cut your own designs or use downloaded JPG and SVG designs (some other formats may also work).

It also has a Print then Cut feature.  It is pretty good, but quite limited and wastes a lot of paper.  They are working on that.

You can use the Design Space on an iPad or iPhone via Bluetooth.  You can read about it on Cricut.com. 

The ScanNCut 2 does not use cartridges. You would have to design, download images or SVG files, or, again, use stamped images.  They do have some basic designs to choose from on their built in library.

I believe it also works on the iPad via the Wireless Activation.  But, honestly, I would need to read up more about it.

They both cut a pretty wide variety of materials.  And both provide very clean cut results.

The Explore has preset cutting choices for materials to be cut.  You just set the dial to your material; so you will not have so much trial and error cutting.  -you'll have less waste. 

As, I explained above, with the ScanNCut 2, you may have to practice the cutting till you get the right setting at first.  Not that big of a flaw, once you find what works for you.
I have not had any waste since I set it to the aforementioned settings.

So, which machine would be best for you depends on how you intend to use it.
If you are not interested in cartridges (pre-designed images) than the ScanNCut 2 may be the best choice.  

But if you need the cartridges, well, the Explore would  be your answer.

I cannot compare either of theses machines to any other machine because these are the only two brands I own and have worked with.

I would never give either one up, though. They are both wonderful in their own practical and wonderful ways.

But, again,  the MOST ATTRACTIVE  FEATURE I do love about the SNC2 is that I Do Not Have Be Connected to a Computer and Internet All of The Time to use it.

Keep in mind that Internet Service Providers are No Longer Offering Unlimited Internet Service like before.         *** You go over = you pay extra.***

- And the Explore (or any other cutting machine) is not the only thing I use my internet service for.

Let me know what you think?

I will be posting some pictures of projects I have made with the SNC 2 and "how to's".

Feel free to offer any information or ask any questions.  

Happy crafting.


And remember, this blog is not a venting venue, rather a place where we share fun and useful information.

Comments will be moderated.